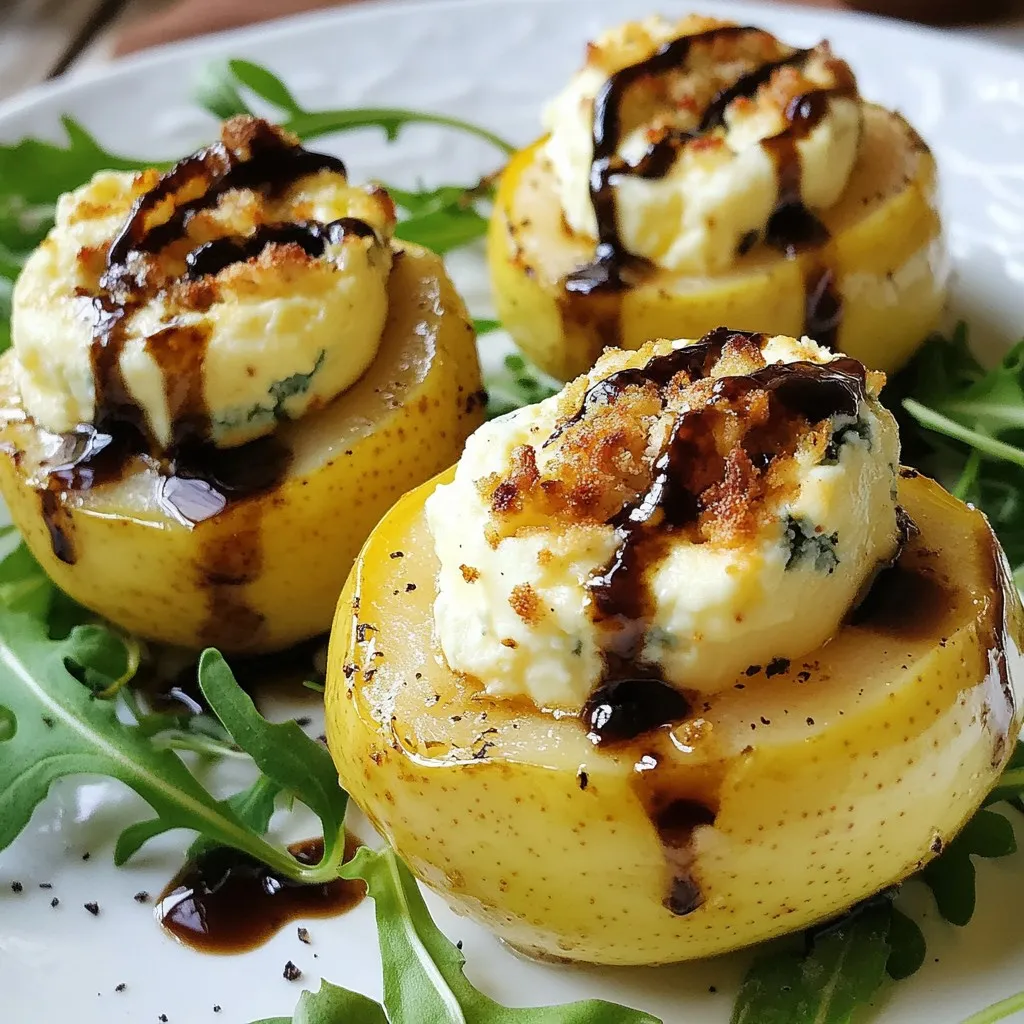
Get ready to impress your guests with a simple and tasty treat: Blue Cheese Stuffed Pears! This delightful recipe combines the sweet crunch of pear with creamy blue cheese for a burst of flavor. Whether you crave a quick snack or an elegant appetizer, this dish is both easy to make and visually stunning. Let’s dive into the ingredients and instructions so you can whip up this crowd-pleaser in no time!
Why I Love This Recipe
- Elegant Presentation: These stuffed pears look stunning on any table, making them perfect for entertaining guests or special occasions.
- Perfect Balance of Flavors: The combination of sweet pears and tangy blue cheese creates a delightful contrast that tantalizes the taste buds.
- Quick and Easy Preparation: With minimal prep time, this recipe is both simple and satisfying, allowing you to enjoy gourmet flavors without the fuss.
- Versatile Ingredient Pairing: Feel free to customize with your favorite nuts or drizzles, making it easy to adapt to your personal taste.
Ingredients
List of Ingredients
To make blue cheese stuffed pears, you’ll need:
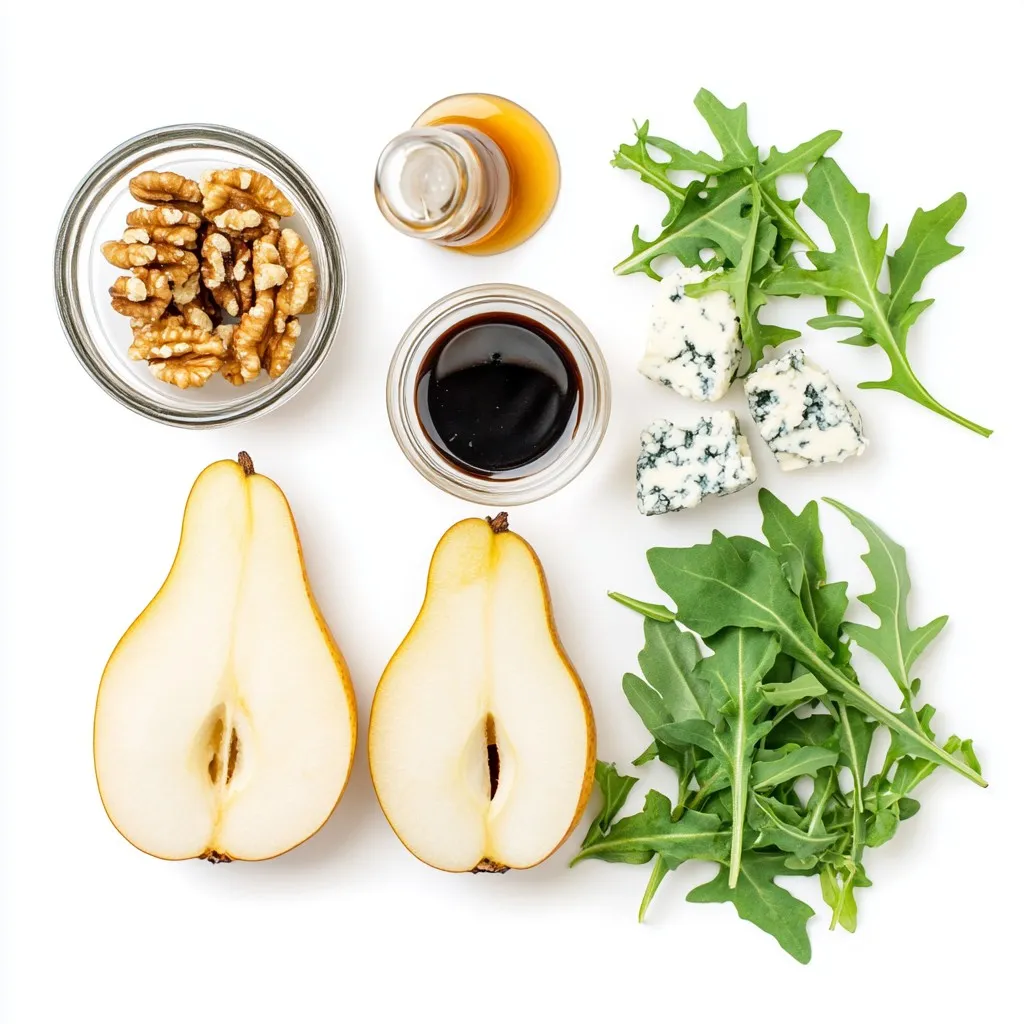
– 4 ripe pears, halved and cored
– 100g blue cheese, crumbled
– 50g cream cheese, softened
– 1 tablespoon honey (preferably local)
– 1 tablespoon chopped walnuts (toasted) – optional
– Fresh arugula leaves for garnish
– Balsamic glaze for drizzling
– Salt and freshly cracked black pepper to taste
Substitutions and Alternatives
You can easily swap some ingredients if needed. Try these options:
– Use goat cheese instead of blue cheese for a milder taste.
– Substitute cream cheese with ricotta for a lighter feel.
– Maple syrup can replace honey for a different sweetness.
– If you don’t have walnuts, try pecans or almonds for crunch.
– Spinach can stand in for arugula if you want a different green.
Importance of Ingredient Quality
Using high-quality ingredients makes a big difference in taste. Here’s why:
– Fresh Pears: Choose ripe pears for the best flavor and texture. They should feel slightly soft when pressed.
– Blue Cheese: A good blue cheese should be creamy and flavorful. It adds depth to the dish.
– Local Honey: Local honey offers unique flavors that enhance your dish.
– Fresh Herbs: Fresh arugula adds a nice peppery flavor and a bright look.
These choices will ensure that your blue cheese stuffed pears shine at any gathering!
Step-by-Step Instructions
Preparation Overview
First, gather all your ingredients. This makes cooking smooth and easy. You need four ripe pears, blue cheese, cream cheese, honey, walnuts, arugula, balsamic glaze, salt, and black pepper. Make sure your oven is ready by preheating it to 375°F (190°C). This step is key for even cooking.
Next, cut the pears in half. Use a melon baller or spoon to remove the core. This creates space for the tasty filling.
Detailed Baking Instructions
In a medium bowl, mix the blue cheese, cream cheese, and honey. Stir until smooth and creamy. Taste the mixture and add a pinch of salt and some black pepper. Adjust the seasoning to your liking.
Now, fill each pear half with the cheese mixture. Pack it in well for a great bite. Place the stuffed pears on a baking sheet lined with parchment paper. This prevents sticking and makes cleanup easier.
Put the baking sheet in the oven. Bake for about 15 to 20 minutes. You want the pears to be tender and the cheese to bubble and turn golden. When done, carefully take the pears out and let them cool for about five minutes.
Serving Suggestions
To serve, place the warm pears on a nice platter. Add fresh arugula leaves for color and crunch. Drizzle balsamic glaze over the stuffed pears just before serving. This adds a sweet and tangy flavor that complements the dish perfectly. Enjoy this simple yet elegant recipe with friends or family!
Tips & Tricks
Choosing the Right Pears
To make great blue cheese stuffed pears, pick ripe pears. Look for pears that yield slightly to gentle pressure. This shows they are soft enough inside. Good choices include Bartlett or Anjou pears. They are sweet and pair well with the salty cheese. Avoid pears that feel hard or have bruises.
Storing Leftover Cheese Mixture
If you have leftover cheese mixture, store it in an airtight container. Keep it in the fridge for up to five days. When ready to use, stir the mixture well. You can stuff more pears or spread it on crackers. This mix also tastes great in salads.
Enhancing Flavor with Seasoning
Season your cheese mixture to boost flavor. Start with a pinch of salt and freshly cracked black pepper. Taste after mixing and adjust as you like. For a sweet twist, add a bit more honey. For a nutty flavor, try mixing in some chopped walnuts. These small changes can make your dish shine even more.
Pro Tips
- Choose the Right Pears: Select ripe pears that yield slightly to pressure for the best flavor and texture.
- Mix Cheese to Preference: Feel free to adjust the ratio of blue cheese to cream cheese based on your taste; more blue cheese will enhance the bold flavor.
- Experiment with Nuts: Adding toasted walnuts not only adds crunch but also complements the creaminess of the cheeses beautifully.
- Serve Warm: For the best experience, serve the stuffed pears warm, allowing the cheese filling to be creamy and delicious.
Variations
Blue Cheese Alternatives
If you want a twist on the classic flavor, try different cheeses. Goat cheese adds a tangy taste. Feta cheese offers a salty bite. Cream cheese alone gives a smooth, mild filling. Each cheese choice changes the dish’s flavor. Experiment to find your favorite.
Seasonal Fruit Substitutes
While pears shine in this recipe, other fruits work well too. Apples add a crisp texture and sweetness. Peaches bring a juicy, summery flavor. You can even use figs for a rich touch. Choose fruits that are ripe and sweet for the best results.
Additional Toppings and Garnishes
Adding toppings makes this dish even better. Toasted walnuts give a nice crunch. Drizzle honey for extra sweetness. A sprinkle of fresh herbs adds color and flavor. Consider a sprinkle of crushed red pepper for some heat. These small changes take your dish to the next level.
Storage Info
Best Practices for Storing Stuffed Pears
Store your blue cheese stuffed pears in an airtight container. This keeps them fresh longer. Place a piece of parchment paper between layers to avoid sticking. They will stay good for about three days in the fridge. Keep them away from strong-smelling foods. The pears can absorb flavors and odors.
Reheating Instructions
To reheat your stuffed pears, preheat your oven to 350°F (175°C). Place the pears on a baking sheet. Cover them loosely with foil to prevent drying out. Heat for about 10 to 15 minutes. Check that they are warm throughout. You can also microwave them, but this may make the pears mushy.
Freezing Options
You can freeze stuffed pears for later use. To do this, prepare the pears but do not bake them. Place them in a single layer on a baking sheet. Freeze for about 1 to 2 hours until firm. Then, transfer them to a freezer-safe container. They will last up to three months in the freezer. When ready to eat, thaw in the fridge overnight and then bake as directed.
FAQs
Can I use any type of blue cheese?
Yes, you can use different blue cheeses. Each type has a unique flavor. Some may be milder or stronger than others. For a creamy taste, choose Gorgonzola. Roquefort offers a sharper bite. Experiment to find which suits your taste best.
How long do stuffed pears last in the fridge?
Stuffed pears can last about 3 to 4 days in the fridge. Make sure to store them in an airtight container. If you want to keep them longer, consider freezing them. However, the texture may change when thawed.
What goes well with baked blue cheese stuffed pears?
Baked blue cheese stuffed pears pair well with sweet and savory items. Try serving them with a light salad of arugula. A drizzle of balsamic glaze adds a sweet touch. You can also enjoy them with nuts or crusty bread. This mix enhances the flavors and makes for a delightful dish.
This article covered how to make delicious blue cheese stuffed pears. We discussed important ingredients, their quality, and easy substitutions. I provided step-by-step instructions for preparation and serving. You learned tips for choosing pears and storing leftovers. We explored variations to customize your dish and shared storage info for keeping it fresh.
In closing, enjoy experimenting with flavors and ingredients. Your stuffed pears can impress anyone. Happy bakin