Are you ready to elevate your dinner game? Crispy Cheese Garlic Chicken Thighs are a simple delight that pairs fully loaded flavors with an easy cooking method. With a crunchy Parmesan and panko coating, these thighs will make your taste buds dance. Join me as we dive into this mouthwatering recipe, packed with tips for maximum crispiness and flavor. Let's transform your weeknight meals into something special!
Why I Love This Recipe
- Deliciously Crispy: The Parmesan and panko combination creates a wonderfully crispy texture that is hard to resist, making each bite incredibly satisfying.
- Flavor Packed: Garlic, paprika, and fresh parsley infuse the chicken with a burst of flavor, elevating the dish beyond a typical baked chicken recipe.
- Easy Preparation: This recipe is simple and quick to prepare, making it perfect for busy weeknights or when entertaining guests.
- Versatile Pairing: These crispy chicken thighs pair wonderfully with a variety of sides, from salads to roasted vegetables, making it a flexible meal option.
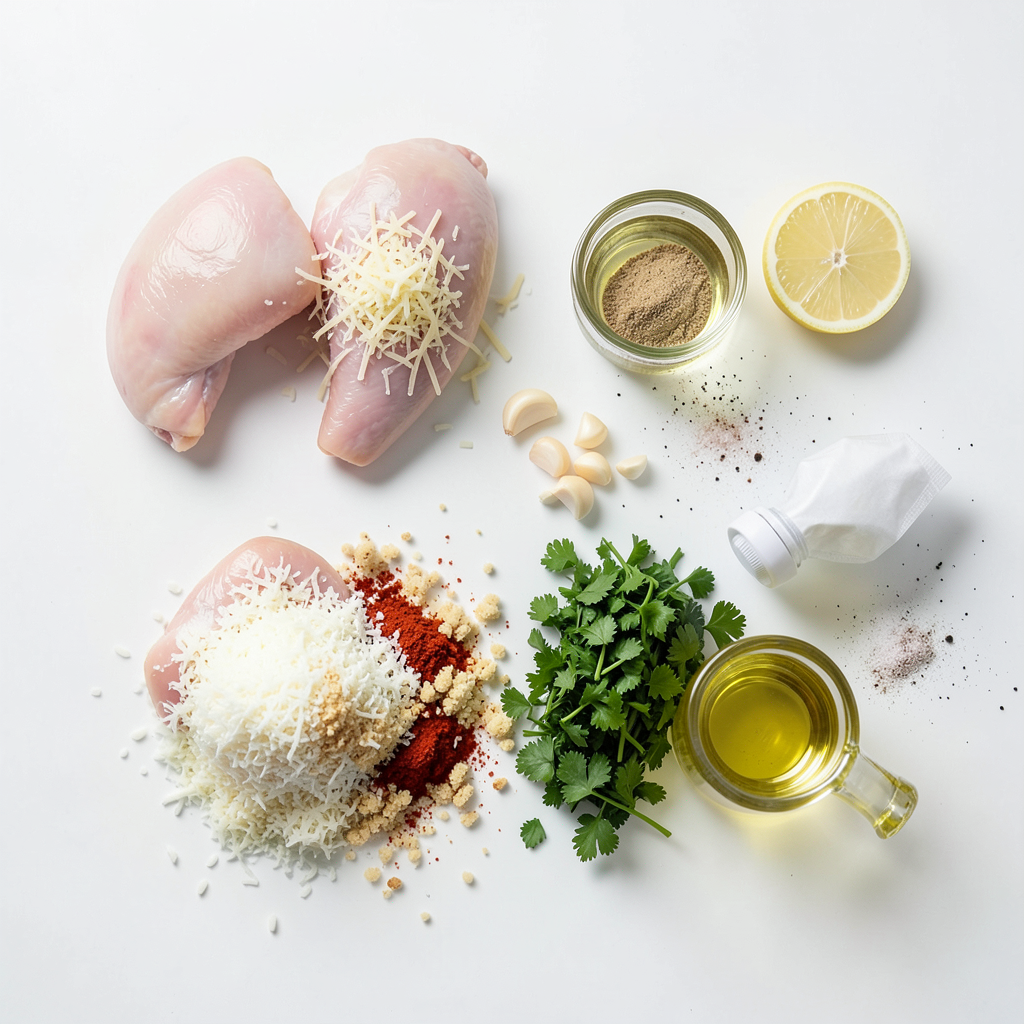
Ingredients
Main Ingredients
- 4 chicken thighs, bone-in with skin
- 1 cup grated Parmesan cheese
- 2 cups panko breadcrumbs
Seasonings and Other Ingredients
- 4 cloves garlic, finely minced
- 2 tablespoons fresh parsley, finely chopped
- 1 teaspoon paprika
- 1 teaspoon onion powder
- 1 teaspoon salt
- ½ teaspoon freshly ground black pepper
Cooking Aids
- 2 tablespoons extra-virgin olive oil
- 1 tablespoon freshly squeezed lemon juice
- Cooking spray for crisping
Gathering the right ingredients sets the stage for success. I love using bone-in chicken thighs. The skin crisps up nicely and keeps the meat juicy. Grated Parmesan cheese adds a rich flavor. Panko breadcrumbs are my go-to for crunch. They make a big difference compared to regular breadcrumbs.
Fresh garlic gives a strong taste. I use four cloves, but feel free to adjust. Chopped parsley adds color and freshness. Paprika and onion powder enhance the flavor profile. Salt and pepper round out the seasoning mix perfectly.
I also use olive oil and lemon juice for the marinade. They help the coating stick well and add flavor. A light mist of cooking spray boosts the crispiness, making each bite delightful.
With these ingredients, you're ready to create a mouth-watering dish that will impress everyone at the table.
Step-by-Step Instructions
Preheat and Prepare
- Preheat the oven to 425°F (220°C).
- Prepare a baking sheet with parchment paper. This keeps the chicken from sticking.
Prepare the Chicken
- Pat the chicken thighs dry for crispiness. This step makes a big difference in texture.
Mix and Coat
- Combine the breadcrumb coating ingredients. Mix together 1 cup of Parmesan cheese, 2 cups of panko breadcrumbs, 4 cloves of minced garlic, and 2 tablespoons of chopped parsley. Also, add 1 teaspoon of paprika, 1 teaspoon of onion powder, 1 teaspoon of salt, and ½ teaspoon of black pepper. Stir well.
- Whisk together 2 tablespoons of olive oil and 1 tablespoon of lemon juice for the marinade. This adds flavor and helps the crumbs stick.
- Coat the chicken thighs with marinade and breadcrumb mixture. First, brush the skin side with the marinade. Then dip it into the breadcrumb mix, pressing down to stick. Flip and repeat on the other side. Aim for a thick layer of crumbs.
Tips & Tricks
Achieving Maximum Crispiness
To get that perfect crispy skin, you need to dry the chicken thighs well. Pat them with paper towels until they are very dry. This step helps the skin crisp up nicely in the oven.
Next, choose panko breadcrumbs instead of regular ones. Panko is coarser and lighter, which makes for a better crunch. It creates a lovely texture that regular breadcrumbs can’t match.
Flavor Enhancements
To make your chicken extra tasty, try adding spices and herbs. Some great options are Italian seasoning or dried thyme. You can also use chili powder for a bit of heat.
Consider marinating the chicken before coating it. A simple mix of olive oil and lemon juice adds great flavor. Let the chicken sit in the marinade for about 30 minutes. This helps the flavors stick and makes the chicken more juicy.
Presentation Suggestions
For an eye-catching display, serve the chicken on a rustic wooden board. Add a sprinkle of fresh parsley on top to brighten the look.
Pair your chicken with side dishes for a full meal. Roasted seasonal vegetables work well. A simple salad with fresh greens is also a great choice. These sides complement the flavors of the chicken perfectly.
Pro Tips
- Pat the Chicken Dry: Ensure your chicken thighs are completely dry before coating. This step is essential for achieving maximum crispiness when baked.
- Use Fresh Ingredients: For the best flavor, use fresh garlic and parsley. Fresh herbs elevate the dish and provide a vibrant taste that dried herbs cannot match.
- Choose the Right Panko: Opt for Japanese-style panko breadcrumbs for an ultra-crispy texture. Their larger size and airy composition result in a delightful crunch.
- Let It Rest: Always allow your chicken to rest for a few minutes after baking. This helps retain the juices, resulting in moist and tender meat.
Variations
Cheese Alternatives
You can change the cheese for this recipe. Try using different types like cheddar or mozzarella. Cheddar gives a sharp taste, while mozzarella adds a nice stretch. Mixing cheeses can create new flavors. You can even use feta for a tangy twist. Experiment and find your favorite cheese mix!
Healthier Options
If you want a healthier meal, consider baking instead of frying. Baking cuts down on fat and still gives you crispiness. You can also try gluten-free breadcrumbs. These options make the dish lighter but just as tasty. Enjoy crispy chicken without the extra calories!
Flavor Experimentation
Feel free to play with flavors in this dish. Add herbs like thyme or rosemary for a fresh taste. You can also spice it up with cayenne pepper for heat. Adjust the garlic levels too. If you love garlic, add more! These small changes can make a big difference in flavor.
Storage Info
Short-term Storage
To store leftovers, let your chicken thighs cool first. Place them in an airtight container. Make sure to cover the container tightly to keep moisture in. Store in the refrigerator for up to three days. When you want to eat them again, just reheat them carefully.
Long-term Storage
For freezing, wrap each chicken thigh in plastic wrap, then place them in a freezer bag. Make sure to press out any air. This helps keep them fresh. You can freeze them for up to three months. To reheat and keep them crispy, preheat your oven to 375°F (190°C). Place the chicken on a baking sheet and bake for about 15-20 minutes. This will help restore their crunchy texture.
Shelf Life
When stored correctly, your crispy chicken thighs can last in the fridge for about three days. If frozen, they are best used within three months for the best taste and texture. Always check for any signs of spoilage before eating.
FAQs
How to Make Crispy Cheese Garlic Chicken Thighs?
To make crispy cheese garlic chicken thighs, follow these easy steps:
1. Preheat your oven to 425°F (220°C).
2. Pat the chicken thighs dry with paper towels.
3. Mix the grated Parmesan, panko breadcrumbs, minced garlic, parsley, paprika, onion powder, salt, and pepper.
4. Whisk olive oil and lemon juice in a separate bowl.
5. Brush the chicken thighs with the olive oil mixture, then coat them with the breadcrumb mix.
6. Place the thighs on a baking sheet, skin side up.
7. Bake for 30-35 minutes until golden brown and crispy.
8. Let the chicken rest for 5 minutes before serving.
You can find the complete step-by-step instructions above.
Can I use boneless chicken thighs?
Yes, you can use boneless chicken thighs. Just keep in mind that the cooking time will change. Boneless thighs cook faster than bone-in ones. You should check them after 20-25 minutes. They should still reach an internal temperature of 165°F (74°C). Using boneless may also change the texture. Bone-in thighs tend to be juicier and more flavorful.
What should the internal temperature be for chicken thighs?
The safe internal temperature for chicken thighs is 165°F (74°C). Use a meat thermometer to check. Insert it into the thickest part of the thigh, avoiding the bone. This ensures the chicken is fully cooked and safe to eat. Cooking it to this temperature helps keep it moist and tender. Always let it rest for 5 minutes after cooking to keep the juices inside.
This blog post offers a complete guide to making crispy cheese garlic chicken thighs. You learned about the key ingredients, from chicken thighs to seasonings. I shared steps for perfect preparation and tips for getting that ideal crunch. You also discovered ways to customize the recipe and store leftovers.
Now you can enjoy a delicious meal while impressing your friends and family! Dive into this dish and let your taste buds lead the way. Happy cooking!