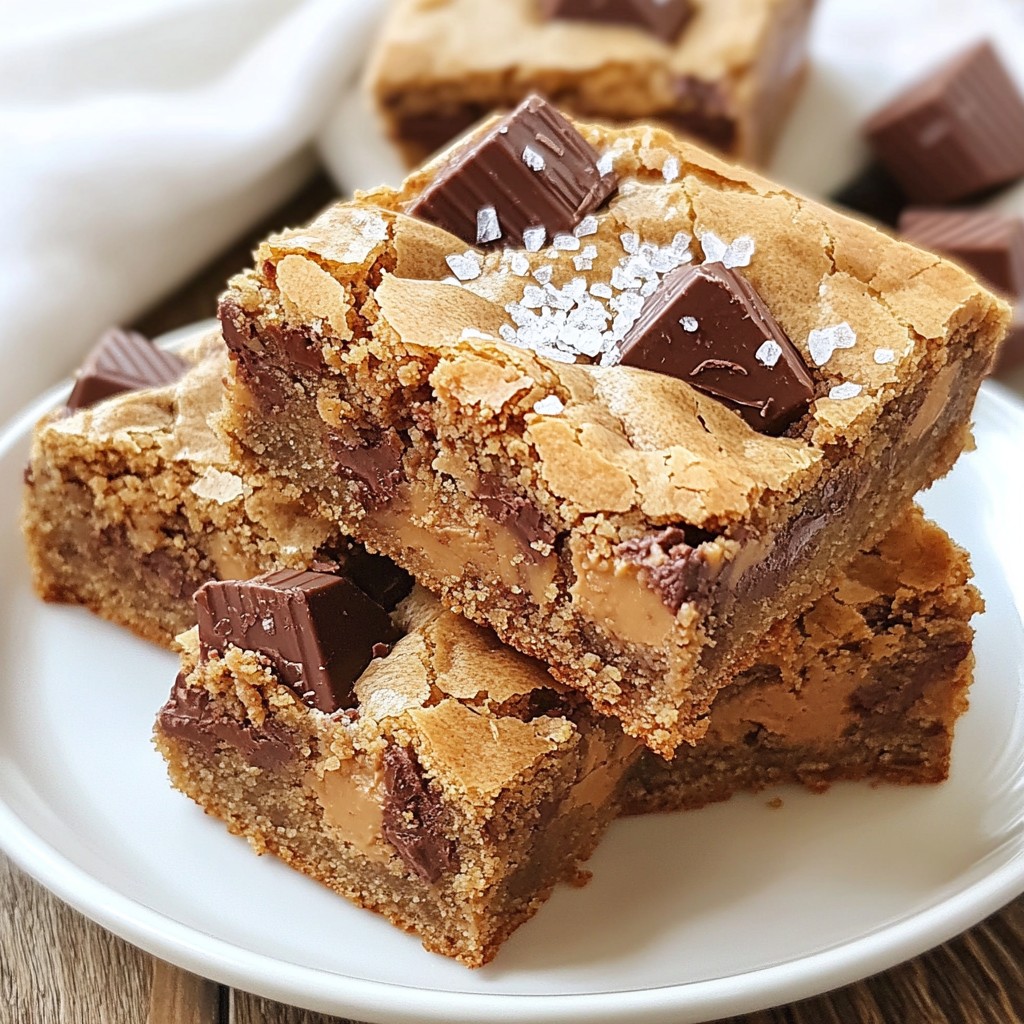
If you love sweet treats that combine creamy peanut butter and rich chocolate, you're in for a real treat! These Peanut Butter Cup Blondies are not just delicious but also easy to make. I’ll guide you step-by-step, from mixing up your ingredients to slicing the perfect squares. Get ready to impress your friends and family with this affordable dessert that is sure to delight everyone’s taste buds! Let's dive in!
Why I Love This Recipe
- Decadent Flavor: These blondies combine the rich taste of peanut butter with the sweetness of chocolate, creating a truly indulgent dessert.
- Easy to Make: With straightforward steps and minimal prep time, these blondies are perfect for both beginner and experienced bakers.
- Perfect for Sharing: Cut them into squares and bring them to parties or gatherings; everyone will love these crowd-pleasers!
- Customizable: You can easily mix in nuts, different chocolate types, or even other candies to make them your own.
Ingredients
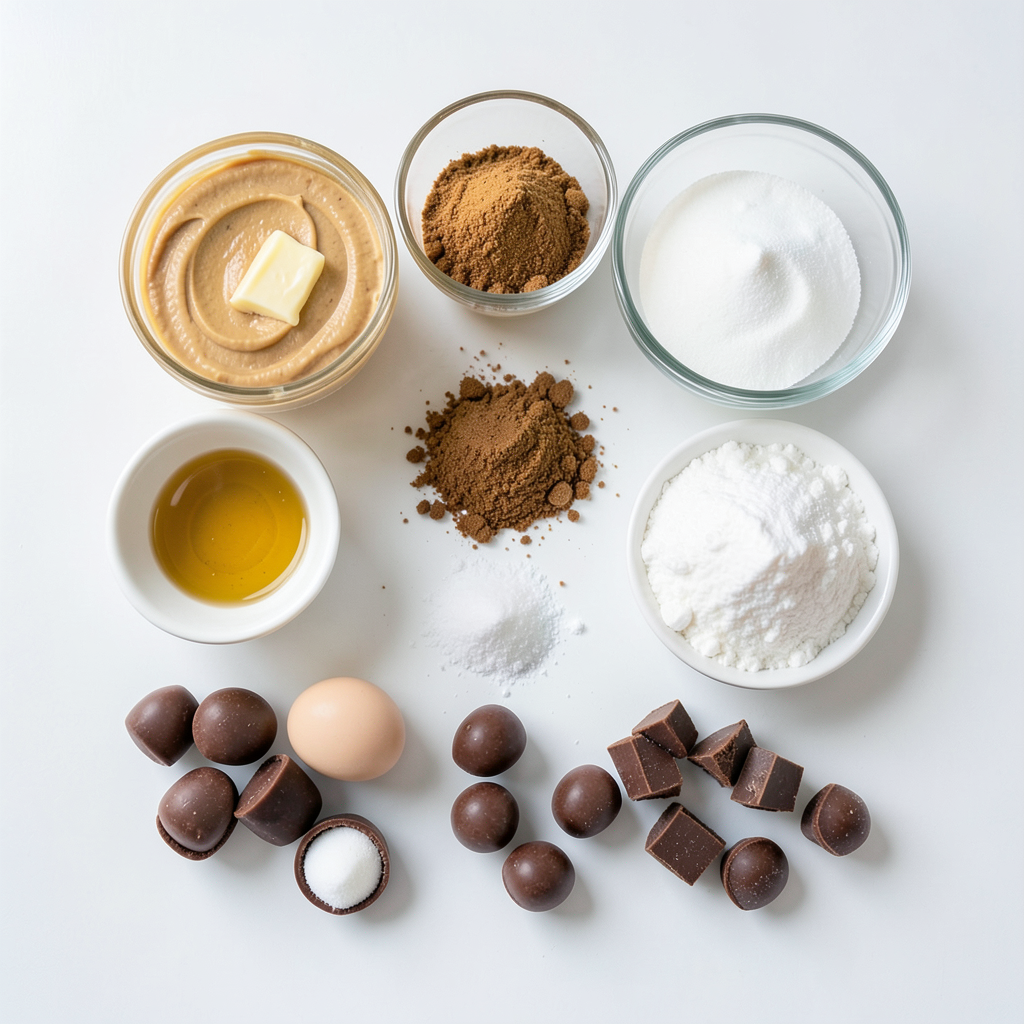
To make Peanut Butter Cup Blondies, you need a few key ingredients. Each one plays a role in creating that soft, chewy texture and rich flavor. Here’s what you will need:
- 1 cup creamy peanut butter
- 1/2 cup unsalted butter, melted
- 1 cup brown sugar, packed tightly
- 1/2 cup granulated sugar
- 2 large eggs, at room temperature
- 1 teaspoon pure vanilla extract
- 1 1/2 cups all-purpose flour
- 1 teaspoon baking powder
- 1/2 teaspoon baking soda
- 1/4 teaspoon fine sea salt
- 1 cup chocolate peanut butter cups, chopped into bite-sized pieces (like Reese's)
- Optional: Flaky sea salt for a finishing touch
Each ingredient adds to the blondies' sweetness and texture. The peanut butter gives the blondies their signature flavor. The butter ensures a rich taste. Both sugars help create that lovely chewy texture. Eggs and vanilla bring moisture and flavor. The flour gives structure, while baking powder and baking soda help them rise. The chocolate peanut butter cups add melty goodness. If you want to elevate the taste, sprinkle some flaky sea salt on top.
Step-by-Step Instructions
Preparing the Oven and Pan
- Preheat the oven to 350°F (175°C).
- Grease an 8x8-inch baking pan. Line it with parchment paper, leaving some overhang.
Mixing Wet Ingredients
- In a large bowl, combine 1 cup of creamy peanut butter and 1/2 cup of melted unsalted butter.
- Stir until the mixture is smooth and creamy.
Incorporating Sugars
- Add 1 cup of packed brown sugar and 1/2 cup of granulated sugar to the wet mixture.
- Blend until creamy using a hand mixer or whisk.
Adding Eggs and Vanilla
- Crack 2 large eggs into the bowl.
- Pour in 1 teaspoon of pure vanilla extract. Mix until smooth and well blended.
Combining Dry Ingredients
- In a separate bowl, whisk together 1 1/2 cups of all-purpose flour, 1 teaspoon of baking powder, 1/2 teaspoon of baking soda, and 1/4 teaspoon of fine sea salt.
Merging Wet and Dry Mixtures
- Gradually add the dry ingredients to the wet mixture.
- Stir gently with a spatula until just combined. A few flour streaks are fine.
Folding in Chocolate
- Carefully fold in 1 cup of chopped chocolate peanut butter cups.
- Make sure they are evenly mixed into the batter.
Baking the Blondies
- Pour the batter into the prepared baking pan.
- Spread it out evenly with a spatula. Bake for 25-30 minutes.
Cooling and Slicing
- After baking, let the blondies cool in the pan for about 10 minutes.
- Use the parchment paper to lift them out and transfer to a wire rack. Cool completely before cutting into squares.
Tips & Tricks
Best Practices for Mixing
To make mixing easier, use a hand mixer. This tool helps blend the wet ingredients quickly. When you add the dry ingredients, stir gently. Overmixing can make the blondies tough. Just mix until you see a few flour streaks.
Ensuring Perfect Texture
To check if the blondies are done, look for golden edges. The center should be set but soft. Stick a toothpick in the middle. If it comes out with moist crumbs, you are good to go. To avoid dry blondies, watch the baking time closely. Set a timer for 25 minutes and check often.
Presentation Tips
Add a sprinkle of flaky sea salt for a burst of flavor. It balances the sweetness and looks great. Serve these blondies warm or at room temperature. Pair them with vanilla ice cream for a special treat. You can also enjoy them with a cup of coffee.
Pro Tips
- Use Room Temperature Eggs: Using eggs at room temperature helps them incorporate better into the batter, resulting in a smoother and more uniform texture.
- Don’t Overmix: When combining the wet and dry ingredients, mix just until combined. Overmixing can lead to dense blondies.
- Chop Chocolate Cups Carefully: For the best texture, chop the chocolate peanut butter cups into small, even pieces to ensure they distribute evenly throughout the batter.
- Cool Completely Before Slicing: Allow the blondies to cool completely before slicing to ensure clean edges and to maintain their shape.
Variations
Alternative Ingredients
You can change things up by using almond butter instead of peanut butter. Almond butter gives a different flavor. It can add a nice, nutty twist. If you want a healthier option, try using coconut sugar or honey. These substitutes can give a unique taste and slightly different texture.
Flavor Additions
To make your blondies even better, consider adding chocolate chips or nuts. Dark chocolate can bring a rich taste. Walnuts or pecans can add crunch. You can also spice things up with a pinch of cinnamon. Cinnamon adds warmth and a cozy flavor that pairs well with peanut butter.
Serving Variants
Serving these blondies with ice cream or whipped cream makes them extra special. The cold creaminess contrasts nicely with the warm blondies. You can also pair them with coffee or dessert wine. The flavors of coffee or wine can enhance the sweetness of the blondies, making for a delightful treat.
Storage Info
Best Practices for Storing
To keep your peanut butter cup blondies fresh, store them in an airtight container. This helps to keep moisture in and prevents them from drying out. You can also separate layers with parchment paper. This way, they won't stick together. For best results, keep them at room temperature.
Freezing Instructions
You can freeze blondies for later enjoyment. First, let them cool completely. Then, wrap each blondie in plastic wrap. Place them in a freezer-safe bag or container. This keeps them fresh for up to three months. When you're ready to eat, take them out and let them thaw at room temperature. For quicker results, you can microwave them for a few seconds.
Shelf Life
When stored at room temperature, blondies last about five days. If you refrigerate them, they may last up to a week. However, refrigeration can change the texture. They might become a bit firmer and less chewy. If you prefer a soft and gooey texture, stick to room temperature storage.
FAQs
What if I don't have chocolate peanut butter cups?
You can use regular chocolate chips. They work well for a similar taste. Another option is to chop up a candy bar like a Snickers or Milky Way. You can even mix in some butterscotch chips for a fun twist.
Can I make these blondies nut-free?
Yes, you can! Substitute peanut butter with sunbutter, made from sunflower seeds. This will give you a nut-free option that is still creamy. You can also try soy nut butter, which is another great choice.
How can I tell if my blondies are done?
Look for golden brown edges. The center should feel set but soft. You can also insert a toothpick; it should come out with a few moist crumbs. If it’s wet, bake a bit longer.
Can I double the recipe?
Yes, you can double the recipe. Use a larger pan, like a 9x13-inch one. Be sure to bake a little longer, about 5-10 minutes more. Keep checking for doneness with the toothpick method.
These blondies are easy to make with simple ingredients and clear steps. You learned how to mix the wet and dry ingredients, add the chocolate, and bake to perfection. Don’t forget to try our tips for the best texture and presentation. You can make variations with different nut butters or toppings. Proper storage will keep your blondies fresh and tasty. Now, go enjoy these delicious treats with friends or family!