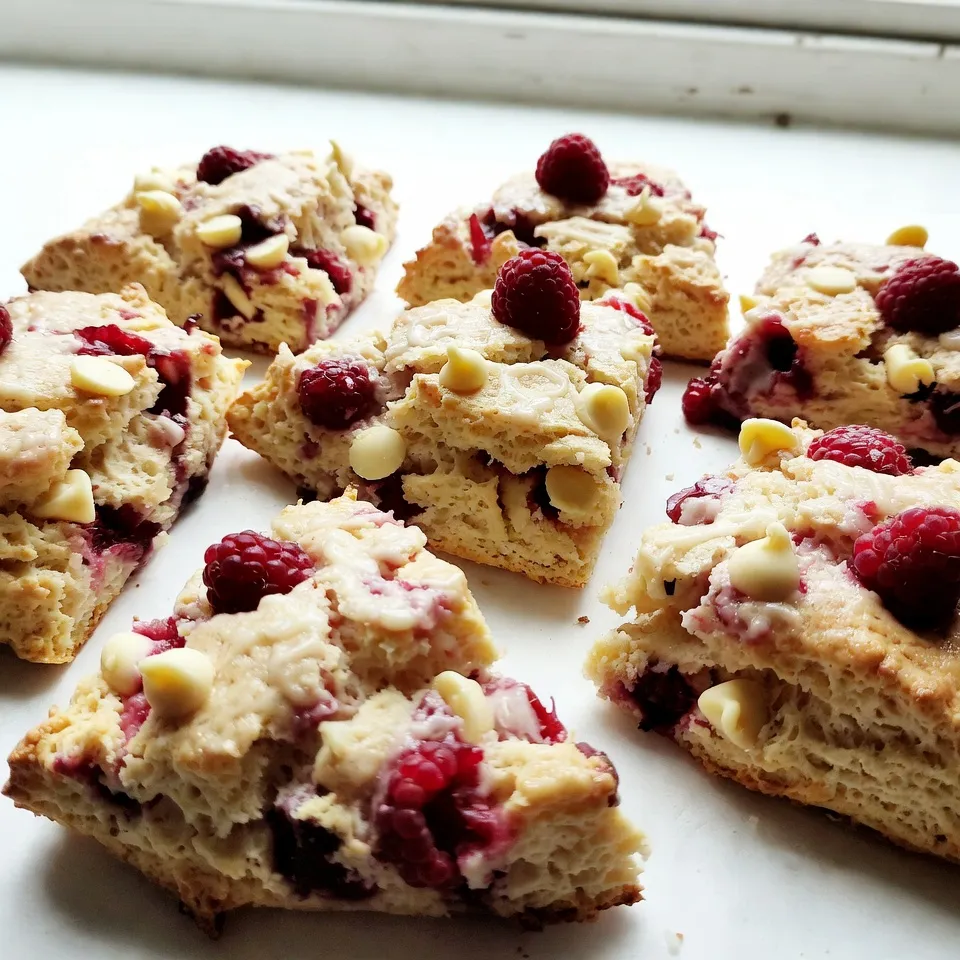
If you crave something flaky, sweet, and bursting with flavor, you need to try my Raspberry White Chocolate Scones. These treats combine fresh raspberries and creamy white chocolate for a delightful twist on a classic. You’ll learn the essential ingredients, step-by-step instructions, and expert tips to make them perfect every time. Say goodbye to store-bought scones and hello to a delightful homemade experience! Let’s dive into the deliciousness.
Why I Love This Recipe
- Delicious Flavor Combination: The tartness of fresh raspberries pairs perfectly with the sweetness of white chocolate, creating a delightful burst of flavor in every bite.
- Easy to Make: This scone recipe is straightforward and quick, making it perfect for both novice bakers and experienced cooks looking for a simple treat.
- Perfect for Any Occasion: Whether it’s a cozy breakfast, a tea party, or a sweet snack, these scones are versatile and fit beautifully into any setting.
- Beautiful Presentation: These scones not only taste amazing but also look stunning, especially when served on a decorative plate with fresh raspberries.
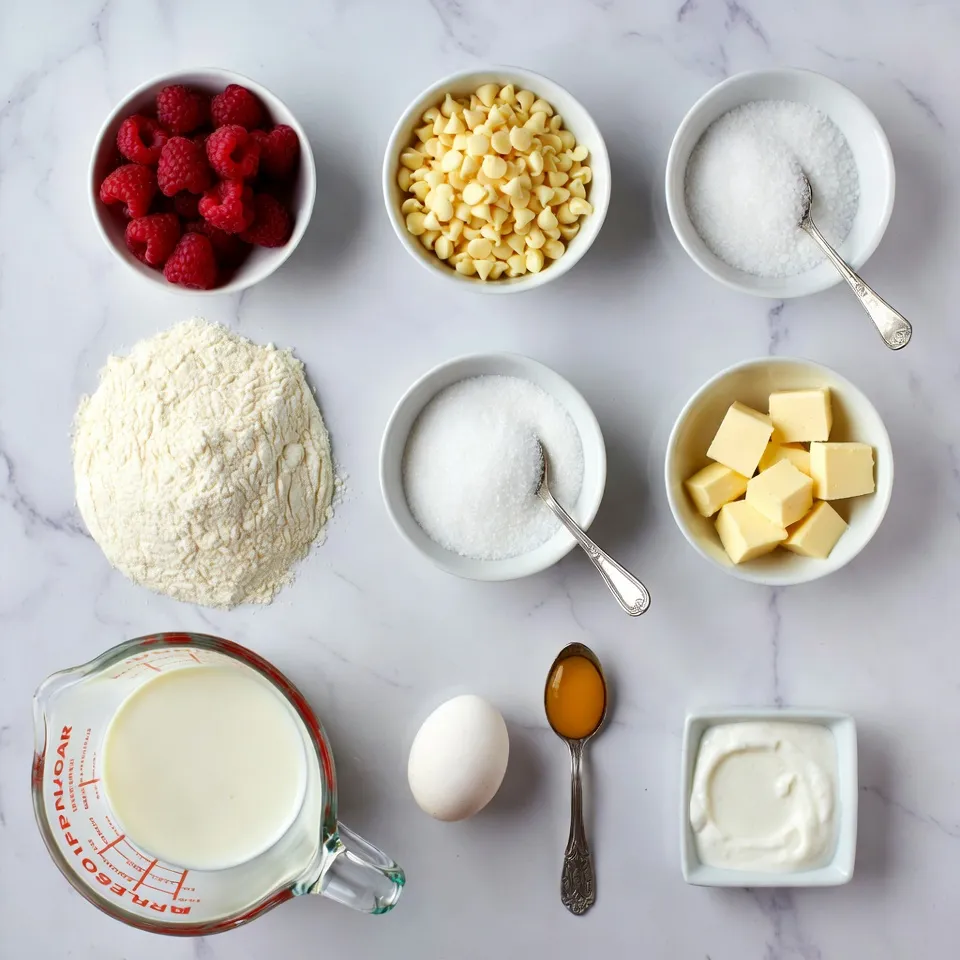
Ingredients
List of Ingredients
– 2 cups all-purpose flour
– 1/4 cup granulated sugar
– 1 tablespoon baking powder
– 1/2 teaspoon salt
– 1/2 cup unsalted butter, cold and cubed
– 1/2 cup heavy cream
– 1 large egg
– 1 teaspoon vanilla extract
– 1 cup fresh raspberries
– 1/2 cup white chocolate chips
– Extra heavy cream for brushing
– Additional granulated sugar for sprinkling
Ingredient Measurements
To make perfect raspberry white chocolate scones, use these exact amounts:
– 2 cups of all-purpose flour give the scones structure.
– 1/4 cup of granulated sugar adds sweetness.
– 1 tablespoon of baking powder helps them rise.
– 1/2 teaspoon of salt balances the flavors.
– 1/2 cup of cold, unsalted butter is key. Cold butter creates flaky layers.
– 1/2 cup of heavy cream adds richness.
– 1 large egg gives the dough stability.
– 1 teaspoon of vanilla extract adds a lovely flavor.
– 1 cup of fresh raspberries offers tartness.
– 1/2 cup of white chocolate chips gives sweetness.
– Brush with extra heavy cream for a golden finish.
– Sprinkle more sugar for a sweet crunch.
Using cold butter is important. It keeps the scones tender and flaky. If the butter warms up, you lose that light texture.
Optional Ingredients
You can switch things up with these ideas:
– Use different berries like blueberries or strawberries.
– Try dark chocolate chips for a richer taste.
– Add zest from a lemon for extra zing.
– Replace heavy cream with buttermilk for a tangy flavor.
Feel free to experiment! These changes can make your scones unique and fun.
Step-by-Step Instructions
Preheat and Prepare
First, preheat your oven to 400°F (200°C). This step is key for the perfect bake. While the oven heats up, prepare your baking sheet. Line it with parchment paper. This will help your scones not stick.
Mixing Dry Ingredients
In a large bowl, combine 2 cups of all-purpose flour, 1/4 cup of granulated sugar, 1 tablespoon of baking powder, and 1/2 teaspoon of salt. Whisk these dry ingredients well. Make sure there are no lumps left.
Incorporating Butter
Now, add 1/2 cup of cold, cubed unsalted butter to the flour mix. You can use a pastry cutter, a fork, or even your fingers. Cut the butter into the flour until it looks like coarse crumbs. Keep some pea-sized pieces for flakiness.
Whisking Wet Ingredients
In another bowl, whisk together 1/2 cup of heavy cream, 1 large egg, and 1 teaspoon of vanilla extract. Mix these until they are well combined and look uniform.
Combining Ingredients
Pour the cream mixture into the bowl with the dry mix. Gently fold them together using a spatula or wooden spoon. Only mix until the dough just starts to come together. Be careful not to overmix. This keeps your scones soft.
Forming and Cutting the Dough
Transfer the dough onto a lightly floured surface. Pat it into a round disc about 1 inch thick. Try not to handle it too much. Use a sharp knife or pizza cutter to slice the dough into 8 wedges. Place these on the prepared baking sheet, leaving about 2 inches between each.
Baking Instructions
Brush the tops of the scones with extra heavy cream. This helps them turn golden brown. Sprinkle some granulated sugar on top for a sweet finish. Bake in your preheated oven for 15-20 minutes. They should puff up and turn golden. A toothpick inserted in the center should come out clean. Enjoy the lovely mix of tart raspberries and sweet white chocolate!
Tips & Tricks
Achieving Flaky Scones
To make scones light and flaky, keep the butter cold. Start with unsalted butter straight from the fridge. Cut it into small cubes, about the size of peas. When mixing, use a pastry cutter or your fingers. Blend it into the flour until it feels like coarse crumbs. Leave some larger pieces to create air pockets. This step is key for a great texture.
Perfecting the Fold
When adding raspberries and white chocolate, be gentle. After you mix the wet and dry ingredients, carefully fold in the raspberries. Use a spatula and make a few turns. Avoid smashing the berries. If you crush them, they will turn the dough pink. You want bursts of flavor, not a pink scone!
Enhancements for Appearance
For a golden finish, brush the tops with heavy cream before baking. This step makes the scones shine. Then, sprinkle some granulated sugar on top. It adds a sweet crunch and makes them look lovely. After baking, your scones should be golden and puffed. Enjoy the beautiful contrast of colors!
Pro Tips
- Chill Your Ingredients: For the best texture, ensure your butter and heavy cream are very cold. This helps create flaky layers in the scones.
- Don’t Overmix: When combining the wet and dry ingredients, mix just until combined. Overmixing can lead to tough scones.
- Use Fresh Raspberries: Fresh raspberries yield the best flavor and texture. If using frozen, do not thaw to prevent excess moisture in the dough.
- Experiment with Flavors: Feel free to add lemon zest or almond extract for an additional flavor dimension to your scones.
Variations
Flavor Combinations
You can switch up the flavors in your scones easily. Try using blueberries or strawberries instead of raspberries. Both fruits add a nice, sweet touch. If you want a richer flavor, swap the white chocolate with dark chocolate. This gives a more intense taste that pairs well with any fruit. You can also mix in nuts like almonds or pecans for added crunch. Being creative makes the scones even more fun!
Gluten-Free Option
If you prefer a gluten-free version, you can use a gluten-free all-purpose flour blend. Make sure it has xanthan gum or add a little yourself. This helps the scones hold together. You can also use almond flour or oat flour for a different texture. Just remember, the taste may change a bit, but they will still be tasty!
Mini Scones
Want to make mini scones? It’s simple! Just divide the dough into smaller pieces. You can cut the round disc into 16 wedges instead of 8. This will give you cute, bite-sized treats. Bake them for a shorter time, about 12-15 minutes. Keep an eye on them so they don’t overbake. Mini scones are perfect for tea parties or breakfast!
Storage Info
Storing Scones
To keep your scones fresh, store them in an airtight container. This helps keep the moisture inside. If you don’t have one, wrap them in plastic wrap. Place them in a cool, dry spot. Avoid placing them in direct sunlight or heat. This will keep your scones tasting great for up to two days.
Reheating Instructions
To warm your scones, preheat the oven to 350°F (175°C). Place the scones on a baking sheet. Heat them for about 5 to 10 minutes. This gives you warm, flaky scones. If you want, you can also use a microwave. Heat for about 10 to 15 seconds, but be careful not to overheat. This keeps the scones soft and tasty.
Freezing Scones
You can freeze both baked and unbaked scones. If freezing before baking, shape the dough and place the wedges on a baking sheet. Freeze them for about an hour, then transfer them to a freezer bag. If you want to freeze baked scones, let them cool completely first. Wrap them tightly and place them in a freezer bag. They can last up to three months. When ready to bake, you can cook frozen scones directly from the freezer. Just add a few extra minutes to the baking time.
FAQs
Can I use frozen raspberries?
Yes, you can use frozen raspberries. They work well in scones, too. Frozen raspberries may release more juice. This can make your dough wetter. You might need to adjust the flour slightly if you use them. Fresh raspberries will give you a firmer texture. They also add a nice burst of flavor.
How can I make these scones sweeter?
To make your scones sweeter, add more sugar. You can increase the granulated sugar by a few tablespoons. You can also sprinkle sugar on top before baking. Consider adding a glaze made of powdered sugar and milk. This will add sweetness and a nice shine to your scones.
What if my dough is too sticky?
If your dough is too sticky, add a bit more flour. Sprinkle flour in small amounts. Mix it in gently until the dough firms up. Avoid overmixing, as that can make the scones tough. You can also chill the dough for 30 minutes. This can help firm it up.
Can I add nuts to the recipe?
Absolutely! Nuts like pecans or walnuts work great in these scones. Chop them into small pieces before adding. Mix them in gently with the raspberries and chocolate. This gives a nice crunch and adds flavor. Just be careful not to add too many, or it might change the dough’s texture.
How do I know when the scones are done baking?
To check if your scones are done, look for a golden color. They should puff up nicely and have a slight shine. Insert a toothpick into the center. If it comes out clean, the scones are ready. Let them cool slightly before serving for the best taste.
You now have all the tools to make delicious scones. We covered the key ingredients, measurements, and step-by-step instructions. You learned tips for achieving flaky texture and beautiful presentation. We also explored variations and storage methods to help your scones last. Remember, you can customize with different flavors or fruits. Enjoy the fun of baking and make these scones uniquely your