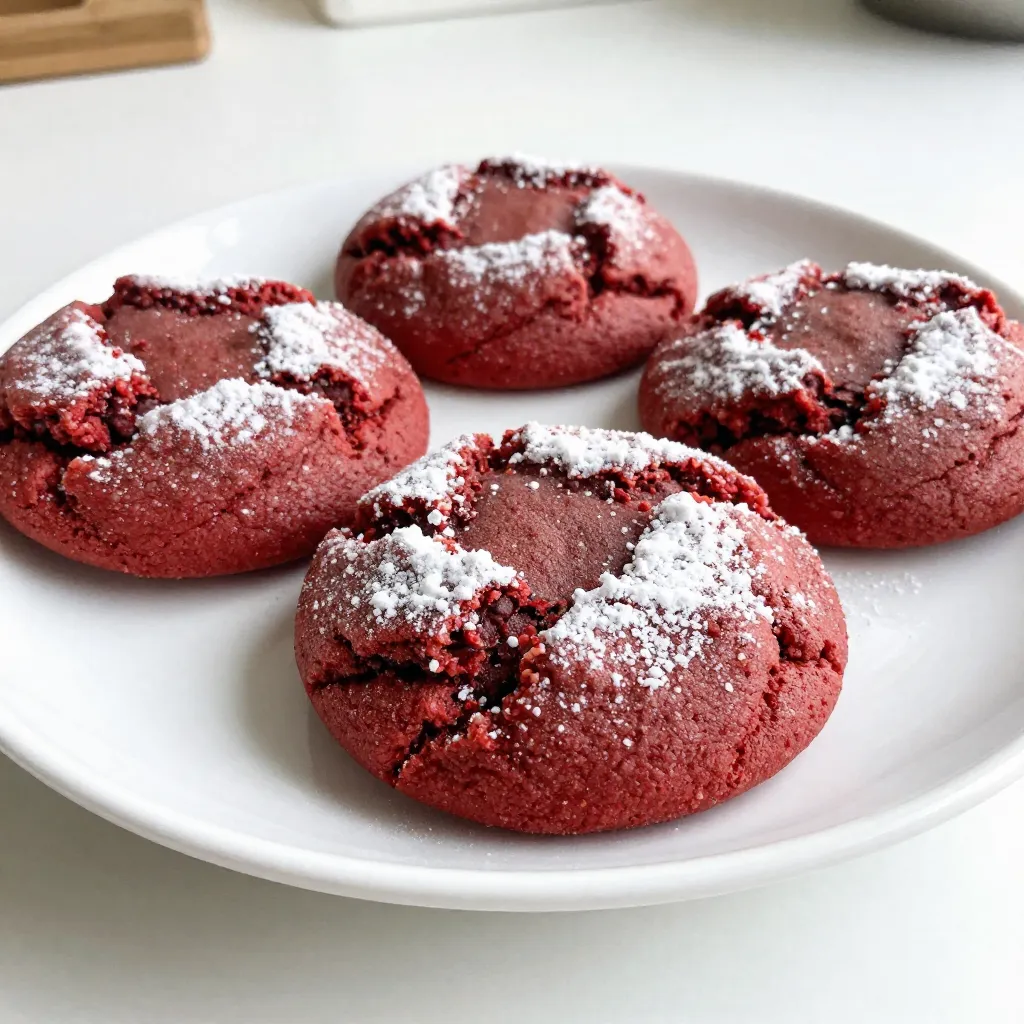
If you’re craving a treat that’s both delightful and easy to make, you’ve found it! Red Velvet Crinkle Cookies offer a fun twist on classic cookies, with their vibrant color and sugary crust. In this post, I’ll walk you through every step, from gathering ingredients to baking the perfect batch. Get ready to impress friends and family with these delicious cookies that are as fun to make as they are to eat!
Why I Love This Recipe
- Irresistible Flavor: The combination of rich cocoa and a hint of vanilla creates a delightful balance that makes these cookies a favorite among all cookie lovers.
- Beautiful Presentation: The vibrant red color, dusted with powdered sugar, gives these cookies an elegant and festive appearance, perfect for any occasion.
- Soft and Chewy Texture: The cookies bake to perfection with a tender center and slightly crispy edges, making each bite a heavenly experience.
- Easy to Make: With simple ingredients and straightforward steps, this recipe is accessible for bakers of all skill levels, ensuring that anyone can enjoy these delicious treats.
Ingredients
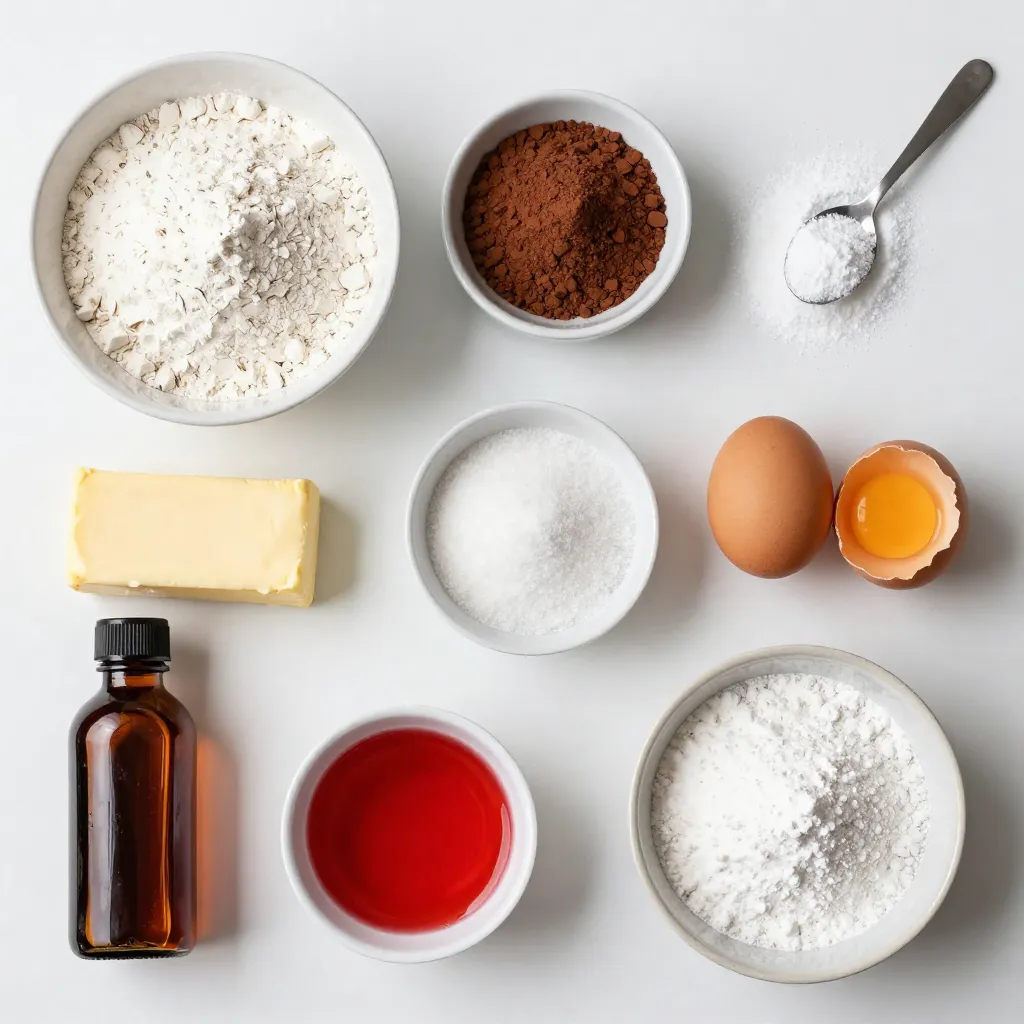
Complete List of Ingredients
– 1 and 1/2 cups all-purpose flour
– 1/2 cup unsweetened cocoa powder
– 1 teaspoon baking powder
– 1/2 teaspoon baking soda
– 1/4 teaspoon salt
– 1/2 cup unsalted butter, softened to room temperature
– 1 cup granulated sugar
– 1 large egg
– 2 teaspoons pure vanilla extract
– 1 tablespoon red food coloring
– 1/2 cup powdered sugar (for dusting and coating)
Measurement Conversions
To help you measure ingredients easily:
– 1 cup = 240 ml
– 1/2 cup = 120 ml
– 1 tablespoon = 15 ml
– 1 teaspoon = 5 ml
– 1 cup of all-purpose flour = about 120 grams
– 1 cup of granulated sugar = about 200 grams
– 1 cup of unsweetened cocoa powder = about 100 grams
Recommended Ingredient Substitutions
If you’re missing some items, here are swaps:
– Use coconut oil for unsalted butter.
– Replace red food coloring with beet juice for natural color.
– Use gluten-free flour mix instead of all-purpose flour.
– Swap granulated sugar with coconut sugar for a healthier option.
– Use egg substitute like applesauce for a vegan version.
These swaps keep the cookies tasty while fitting your needs. Feel free to experiment with flavors and textures!
Step-by-Step Instructions
Preparation Steps
– Preheating the Oven
First, preheat your oven to 350°F (175°C). This ensures that your cookies bake evenly.
– Preparing the Baking Sheet
Line a baking sheet with parchment paper. This helps prevent sticking and makes cleanup easy.
Mixing the Ingredients
– Creaming Butter and Sugar
In a large bowl, cream together 1/2 cup unsalted butter and 1 cup granulated sugar. Use an electric mixer on medium speed. Beat until the mixture is light and fluffy, about 3 to 4 minutes.
– Incorporating Wet and Dry Ingredients
Add 1 large egg, 2 teaspoons pure vanilla extract, and 1 tablespoon red food coloring to the butter-sugar mix. Blend on low speed until all the ingredients are combined. Next, sift together 1 and 1/2 cups all-purpose flour, 1/2 cup cocoa powder, 1 teaspoon baking powder, 1/2 teaspoon baking soda, and 1/4 teaspoon salt in another bowl. Gradually mix in the dry ingredients. Be gentle to keep the dough soft.
Shaping and Baking
– Chilling the Dough
Cover the dough with plastic wrap and chill it in the fridge for 30 minutes. This step makes the dough easier to handle.
– Rolling and Coating Cookies
After chilling, use a cookie scoop or your hands to roll the dough into 1-inch balls. Roll each ball in 1/2 cup powdered sugar until coated well. This gives the cookies their crinkle look.
– Baking Time and Temperature
Place the coated dough balls on the prepared baking sheet, spacing them about 2 inches apart. Bake in the preheated oven for 10 to 12 minutes. The edges should look set, but the centers can stay soft. Let the cookies cool on the baking sheet for 5 minutes before moving them to a wire rack.
Tips & Tricks
Achieving the Perfect Texture
To get the right texture for your Red Velvet Crinkle Cookies, you need to chill the dough. Chilling makes the dough firm. This helps the cookies hold their shape while baking. Aim for a soft, slightly sticky dough. If the dough is too dry, your cookies may turn out tough. Remember, gentle mixing is key. Overmixing can lead to dense cookies.
Common Mistakes to Avoid
One common mistake is skipping the chilling step. This can cause your cookies to spread too much. Also, avoid using too much flour. Measuring flour incorrectly can lead to dry cookies. Use the spoon-and-level method when measuring. Finally, don’t forget to coat your dough balls in powdered sugar. This gives them their signature crinkle look!
Best Practices for Decorating and Serving
For a stunning presentation, serve your cookies on a colorful platter. A decorative box also works great. Just before serving, dust them lightly with more powdered sugar. This adds a nice touch. Consider pairing these cookies with a glass of milk or coffee. They are even better when shared with friends!
Pro Tips
- Chill the Dough: Chilling the dough for at least 30 minutes helps to firm it up, making it easier to roll and shape while preventing excessive spreading during baking.
- Use Quality Ingredients: Using high-quality cocoa powder and pure vanilla extract will enhance the flavor of your cookies, giving them a rich and delightful taste.
- Don’t Overbake: Keep an eye on the cookies while baking; they should be set at the edges but still soft in the center. This ensures a chewy texture that everyone loves.
- Dust Generously: Coat the dough balls thoroughly in powdered sugar before baking to achieve the classic crinkle appearance and a sweet contrast to the rich cookie.
Variations
Gluten-Free Red Velvet Crinkle Cookies
To make gluten-free red velvet crinkle cookies, swap the all-purpose flour with a gluten-free blend. Look for a blend that includes xanthan gum. This will help the cookies hold their shape and texture. You can find these blends in most grocery stores. The other ingredients can stay the same. Just follow the same steps, and you’ll enjoy delicious cookies without gluten.
Alternate Flavor Profiles
You can add fun flavors to your red velvet crinkle cookies. Consider mixing in chocolate chips for a tasty twist. Use semi-sweet or white chocolate chips to enhance the cookie’s sweetness and richness. You can also add nuts like pecans or walnuts for extra crunch. These additions will surprise your friends and family with a new flavor in every bite.
Seasonal Variations
Red velvet crinkle cookies are perfect for any holiday. For Valentine’s Day, use heart-shaped cookie cutters. You can even sprinkle some edible glitter on top for a festive look. For Christmas, add a dash of peppermint extract to the dough. You could also color the powdered sugar with green or red food coloring. These small changes can make your cookies fit the season while keeping the same delightful taste.
Storage Info
How to Store Cookies for Freshness
To keep your red velvet crinkle cookies fresh, store them in an airtight container. Place a piece of parchment paper between layers to avoid sticking. This method helps keep them soft. You can enjoy cookies for up to a week at room temperature. If you want to keep them longer, refrigeration is a good option. Just remember to seal them well.
Freezing Instructions
Freezing cookies is easy. First, let the cookies cool completely. Then, place them in a single layer on a baking sheet and freeze for about an hour. This step prevents them from sticking together. Once frozen, transfer the cookies to a freezer-safe bag. You can freeze them for up to three months. To defrost, leave them at room temperature for about 30 minutes before enjoying.
Best Serving Suggestions
These cookies shine at any gathering. Serve them on a pretty platter for a festive look. Dust some extra powdered sugar on top for a touch of elegance. Pair them with milk or coffee for a tasty treat. You can also stack them in a decorative box for a lovely gift. Enjoy sharing these delightful cookies with friends and family!
FAQs
How do I prevent my cookies from spreading?
To stop your cookies from spreading, chill the dough before baking. After mixing, wrap the dough in plastic wrap. Place it in the fridge for about 30 minutes. This cools the butter, helping the cookies keep their shape. Also, make sure you space the dough balls correctly on the baking sheet. Leave about 2 inches between each ball.
Can I use liquid food coloring instead of gel?
You can use liquid food coloring, but it may change the cookie’s texture. Liquid food coloring has more water content. This extra moisture can make the dough too wet. If you use it, you might need to add a bit more flour to balance it out. Gel food coloring is thicker and gives a richer color without changing the dough much.
What should I do if my dough is too sticky?
If your dough feels too sticky, add a bit more flour. Start with one tablespoon at a time. Mix it in until the dough becomes manageable. Another option is to chill the dough longer. Cool dough helps it firm up. This makes it easier to roll into balls without sticking to your hands.
You now have a solid understanding of making delicious cookies. We covered all the key steps, from gathering ingredients to storage tips. You learned about ingredient swaps, preparation, and baking methods. Plus, I shared common mistakes and fun variations. Remember, practice makes perfect. Don’t hesitate to experiment with flavors or decorations. Enjoy your baking journey, and share these treats with friends and family! They will love your result