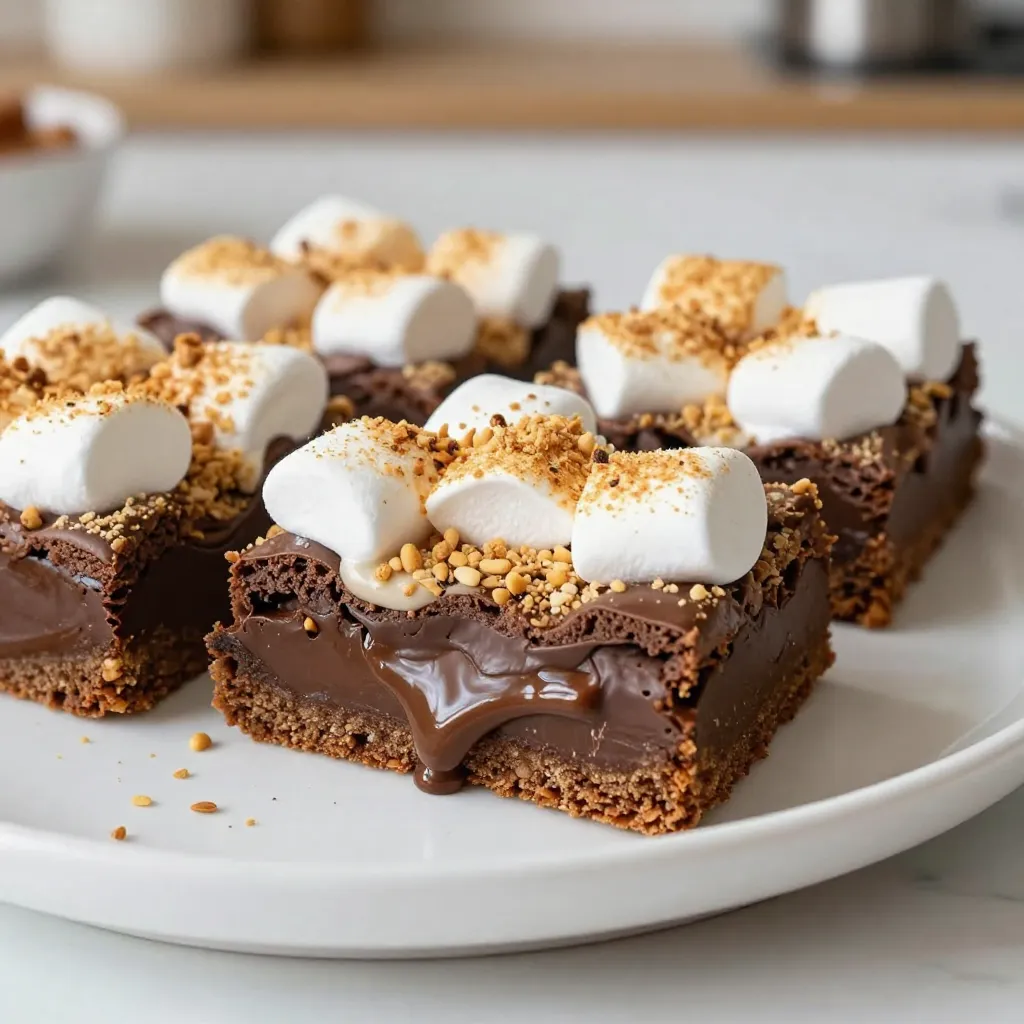
Are you ready to elevate your camping desserts? S’mores Brownie Bars are your answer! These bars blend gooey marshmallows, rich chocolate, and crunchy graham crackers into a perfect treat. Easy to make and ideal for any outdoor adventure, this dessert will impress your family and friends. Follow along as I share the simple recipe and tips to make these tasty treats. Get ready to enjoy s’mores like never before!
Why I Love This Recipe
- Decadent Flavor: The combination of chocolate, marshmallows, and graham crackers creates an irresistible s’mores experience in every bite.
- Easy to Make: This recipe requires simple ingredients and straightforward steps, making it perfect for bakers of all levels.
- Perfect for Sharing: These brownie bars are cut into squares, making them easy to share at gatherings, parties, or just for a cozy family treat.
- Customizable: Feel free to add your favorite nuts or swap chocolate types to make these bars your own!
Ingredients
To make S’mores Brownie Bars, you need fresh and tasty ingredients. Here’s what you’ll need:
– 1/2 cup unsalted butter, melted
– 1 cup granulated sugar
– 2 large eggs
– 1 teaspoon pure vanilla extract
– 1/3 cup unsweetened cocoa powder
– 1 cup all-purpose flour
– 1/4 teaspoon fine sea salt
– 1 cup mini marshmallows
– 1/2 cup semi-sweet chocolate chips
– 1/2 cup crushed graham crackers (plus extra for topping)
– 1/2 cup milk chocolate bar, broken into bite-sized pieces
These ingredients make the bars rich and sweet. The butter gives a soft texture, while sugar adds sweetness. Eggs help bind everything together. Cocoa powder brings that chocolate flavor that everyone loves.
The flour keeps the bars firm, and the salt balances the sweetness. Mini marshmallows add a chewy texture, and chocolate chips bring extra chocolatey goodness. Crushed graham crackers give that classic s’mores crunch. Finally, the milk chocolate pieces melt beautifully on top.
Now you’re ready to gather these ingredients and start your S’mores Brownie Bars adventure!

Step-by-Step Instructions
Preheating and Preparing the Pan
First, preheat your oven to 350°F (175°C). Grab a 9×9 inch baking pan. You can grease it with butter or line it with parchment paper. This will help your brownies come out clean and easy.
Mixing Wet Ingredients
In a large bowl, mix the melted butter and the granulated sugar. Stir until it is smooth. Next, add the two large eggs, one at a time. Mix well after each egg. Finally, stir in the vanilla extract until combined.
Combining Dry Ingredients with Wet Mixture
In another bowl, whisk together the cocoa powder, flour, and sea salt. Make sure they are mixed well. Now, fold this dry mix into your wet mixture. Do this gently to keep the brownies soft.
Folding in S’mores Elements
Now comes the fun part! Gently fold in the mini marshmallows, chocolate chips, and crushed graham crackers. Make sure they spread evenly in the batter. This is what makes it a true s’mores treat.
Baking Instructions
Pour the batter into the prepared pan. Use a spatula to spread it out evenly. Press the milk chocolate pieces into the surface of the batter, letting them sink a bit. Bake in the oven for 25 to 30 minutes. To check if they are done, stick a toothpick in the center. It should come out with a few moist crumbs.
Cooling and Serving Tips
After baking, let the brownies cool in the pan for about 15 minutes. Then, sprinkle more crushed graham crackers and marshmallows on top. For an extra treat, broil it for 1-2 minutes. Keep an eye on it to avoid burning. Let the bars cool completely before cutting them. This makes slicing easier. Enjoy your tasty s’mores brownie bars!
Tips & Tricks
Getting the Perfect Texture
To get the best texture for your s’mores brownie bars, pay close attention when mixing. Mix the wet ingredients until smooth but do not overmix. When folding in dry ingredients, stop as soon as you see no more flour. This keeps your bars soft and chewy. The mini marshmallows and chocolate chips add a great texture contrast, so distribute them evenly in the batter.
Ingredient Substitutions
If you need to switch up some ingredients, here are a few easy swaps:
– Use coconut oil instead of butter for a dairy-free option.
– Try brown sugar instead of granulated sugar for a richer taste.
– Use almond flour if you prefer a gluten-free version. Just remember to adjust the amount to ensure the right consistency.
– For a fun twist, swap the semi-sweet chocolate chips with white chocolate or butterscotch chips.
Serving Suggestions
Serve your s’mores brownie bars warm for a gooey treat. Place them on a rustic wooden platter for a campfire feel. You can garnish with whole graham crackers and fluffy marshmallows around the edges. Drizzle some chocolate sauce on top for extra sweetness. These bars are perfect for camping trips or backyard hangouts. Enjoy them with friends and family!
Pro Tips
- Storage Tips: Keep your S’mores Brownie Bars in an airtight container at room temperature for up to 3 days, or refrigerate for up to a week to maintain freshness.
- Mix-Ins Variation: Feel free to customize your brownie bars by adding nuts like walnuts or pecans for extra crunch and flavor!
- Serving Suggestion: Serve these brownie bars warm with a scoop of vanilla ice cream on top for an indulgent dessert experience.
- Toasting Marshmallows: For a campfire flavor, toast the marshmallows on top using a kitchen torch before serving to achieve that classic s’mores taste.
Variations
Nutty S’mores Brownie Bars
You can add a nutty twist to your s’mores brownie bars. Chopping nuts adds great flavor. Walnuts or pecans work well. Just mix in half a cup with the other goodies. The nuts give a nice crunch and extra taste.
Gluten-Free Options
If you need a gluten-free version, swap regular flour for almond flour or a gluten-free blend. This change keeps the brownies moist and tasty. Make sure your chocolate chips and graham crackers are also gluten-free.
S’mores Brownie Bars with Peanut Butter
For a rich flavor, try adding peanut butter. Mix in half a cup of creamy peanut butter to the wet ingredients. It adds a great taste and pairs well with chocolate. You can also drizzle some on top before baking for a fun design.
Storage Info
Best Storage Practices
To keep your S’mores Brownie Bars fresh, store them in an airtight container. Layer parchment paper between bars to prevent sticking. Keep the container at room temperature for up to three days. If you want to keep them longer, refrigeration is an option. Just remember, cold storage can affect the texture.
Reheating Instructions
If you want to enjoy a warm brownie bar, simply reheat them in the microwave. Place a bar on a microwave-safe plate and heat for about 10-15 seconds. Check regularly to avoid overheating. This quick method makes the chocolate melt again and gives a gooey experience.
Freezing S’mores Brownie Bars
You can freeze these treats for up to three months. First, cut the brownie bars into squares. Wrap each square in plastic wrap, then place them in a freezer bag. When ready to eat, thaw them in the fridge overnight. You can also reheat them after thawing for a warm treat.
FAQs
Can I use a different type of chocolate?
Yes, you can use dark chocolate or white chocolate. Each type gives a unique taste. Dark chocolate adds richness, while white chocolate adds sweetness. Feel free to mix and match!
How do I store leftovers?
Store leftovers in an airtight container. Keep them at room temperature for up to three days. For longer storage, place them in the fridge. Just make sure they are sealed well to keep them moist.
Can I make this recipe in advance?
Yes! You can make these brownie bars a day ahead. Just bake, cool, and store them as I mentioned above. They taste great the next day, too!
What can I substitute for eggs?
You can use unsweetened applesauce or mashed bananas. Use 1/4 cup for each egg you replace. This will help keep your brownies moist and tasty!
This blog post walks you through making tasty s’mores brownie bars. We covered ingredients, steps, and tips for perfect bars. You learned about fun variations and how to store leftovers.
Remember, these brownie bars are not just a treat; they bring joy. Enjoy the process, share them with friends, and have fun! I hope you create these treats often and explore new flavors. Happy bakin